Cayenne Database First tutorial
1. Setup
1.1. Prerequisites
You can start with this tutorial, or you can do "Getting Started with Cayenne" first and then continue with this tutorial.
This chapter lists the recommended software used in the tutorial.
1.1.2. IntelliJ IDEA IDE
Download and install the free IntelliJ IDEA Community Edition IDE. This tutorial uses version 2017.1, but any recent IntelliJ IDEA version and edition will do.
1.1.3. Maven
Two Maven plugins are used:
-
cayenne-maven-plugin - among other things, allows to reverse-engineer the Cayenne model from the database and to update the model after the database has been changed.
-
cayenne-modeler-maven-plugin - provides a convenient way of starting the Cayenne Modeler
1.1.4. MySQL
MySQL database server is used for demonstrating Cayenne’s ability to read the DB schema and to build/update the Cayenne model from it.
You can create test database with any tools you comfortable with, here is full DB schema that will be used in this tutorial:
CREATE SCHEMA IF NOT EXISTS cayenne_demo; USE cayenne_demo;
CREATE TABLE artist (DATE_OF_BIRTH DATE NULL, ID INT NOT NULL AUTO_INCREMENT, NAME VARCHAR(200) NULL, PRIMARY KEY (ID)) ENGINE=InnoDB;
CREATE TABLE gallery (ID INT NOT NULL AUTO_INCREMENT, NAME VARCHAR(200) NULL, PRIMARY KEY (ID)) ENGINE=InnoDB;
CREATE TABLE painting (ARTIST_ID INT NULL, GALLERY_ID INT NULL, ID INT NOT NULL AUTO_INCREMENT, NAME VARCHAR(200) NULL, PRIMARY KEY (ID)) ENGINE=InnoDB;
ALTER TABLE painting ADD FOREIGN KEY (ARTIST_ID) REFERENCES artist (ID) ON DELETE CASCADE;
ALTER TABLE painting ADD FOREIGN KEY (GALLERY_ID) REFERENCES gallery (ID) ON DELETE CASCADE;
You can save it to cayenne_demo.sql file and import to your database with following command:
$ mysql < cayenne_demo.sql
1.2. Maven Project
The goal of this chapter is to create a new Java project in IntelliJ IDEA and to setup Maven Cayenne plugin
1.2.1. Create a new Project in IntelliJ IDEA
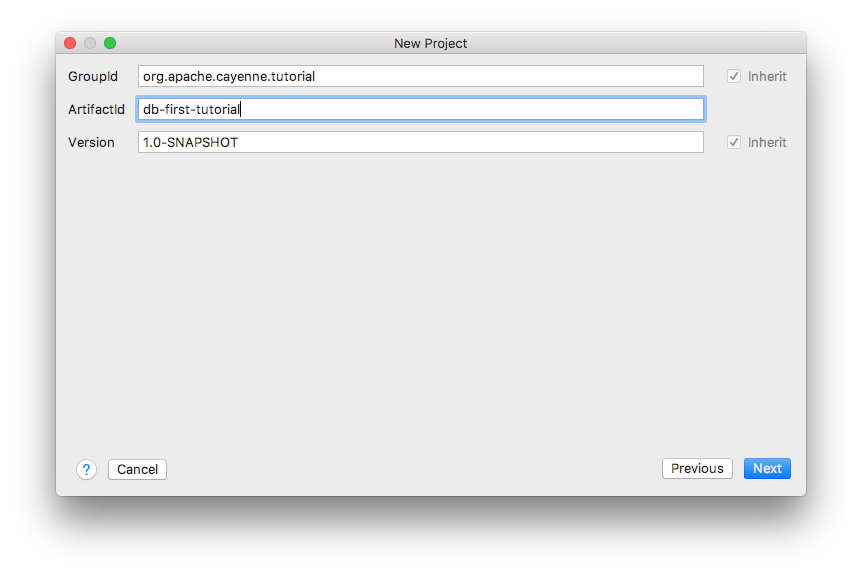
In IntelliJ IDEA select File > New > Project… and then select "Maven" and click "Next". In the dialog shown on the screenshot below, fill the "Group Id" and "Artifact Id" fields and click "Next".
On next dialog screen you can customize directory for your project and click "Finish". Now you should have a new empty project.
1.2.2. Plugin setup
Next step is setting up Cayenne plugin in pom.xml file. For the convenience let’s define Cayenne version that we will use across project file:
<properties>
    <cayenne.version>4.1.1</cayenne.version>
</properties>
Next step is to include plugin. Here is code snippet that enable cayenne-maven-plugin in our demo project:
<build>
    <plugins>
        <plugin>
            <groupId>org.apache.cayenne.plugins</groupId>
            <artifactId>cayenne-maven-plugin</artifactId>
            <version>${cayenne.version}</version>
        </plugin>
    </plugins>
</build>
2. Importing database
2.1. Reverse engineering database
Now we have everything ready and can proceed to importing Cayenne model from our Mysql database
2.1.1. Configuring plugin
To let Cayenne plugin do its job we must tell it what to import and where it should get data. So let’s begin, here is sample settings for the data source:
<plugin>
    ...
    <configuration>
        <dataSource>
            <driver>com.mysql.jdbc.Driver</driver>
            <url>jdbc:mysql://127.0.0.1:3306/cayenne_demo</url>
            <username>root</username>
            <password>your-mysql-password</password>
        </dataSource>
    </configuration>
    <dependencies>
        <dependency>
            <groupId>mysql</groupId>
            <artifactId>mysql-connector-java</artifactId>
            <version>6.0.5</version>
        </dependency>
</dependencies>| Don’t forget to set your actual MySQL login and password |
We have told plugin where it should load data from, now let’s set where it should store Cayenne model:
<configuration>
    ...
    </dataSource>
    <cayenneProject>${project.basedir}/src/main/resources/cayenne/cayenne-project.xml</cayenneProject>
    <map>${project.basedir}/src/main/resources/datamap.map.xml</map>
    ...
And a last small step we need to do is to set default package where our model classes will be and catalog where our tables are:
<configuration>
    ...</map>
    <dbImport>
        <defaultPackage>org.apache.cayenne.tutorial.persistent</defaultPackage>
        <catalog>cayenne_demo</catalog>
    </dbImport>
2.1.2. Running plugin
Finally we can run db import, it is as easy as just running this command in terminal:
$ mvn cayenne:cdbimport
If everything was setup properly you should see output like this:
...
[INFO] +++ Connecting: SUCCESS.
[INFO] Detected and installed adapter: org.apache.cayenne.dba.mysql.MySQLAdapter
[INFO]   Table: cayenne_demo.artist
[INFO]   Table: cayenne_demo.gallery
[INFO]   Table: cayenne_demo.painting
[INFO]     Db Relationship : toOne  (painting.GALLERY_ID, gallery.ID)
[INFO]     Db Relationship : toMany (gallery.ID, painting.GALLERY_ID)
[INFO]     Db Relationship : toOne  (painting.ARTIST_ID, artist.ID)
[INFO]     Db Relationship : toMany (artist.ID, painting.ARTIST_ID)
[INFO]
[INFO] Map file does not exist. Loaded db model will be saved into '~/work/cayenne/db-first-tutorial/src/main/resources/datamap.map.xml'
[INFO]
[INFO] Detected changes:
[INFO]     Create Table         artist
[INFO]     Create Table         painting
[INFO]     Create Table         gallery
[INFO]
[WARNING] Can't find ObjEntity for painting
[WARNING] Db Relationship (Db Relationship : toMany (artist.ID, painting.ARTIST_ID)) will have GUESSED Obj Relationship reflection.
[WARNING] Can't find ObjEntity for gallery
[WARNING] Db Relationship (Db Relationship : toOne  (painting.GALLERY_ID, gallery.ID)) will have GUESSED Obj Relationship reflection.
[INFO] Migration Complete Successfully.
You can open created datamap.map.xml file and check it’s content in IDEA:
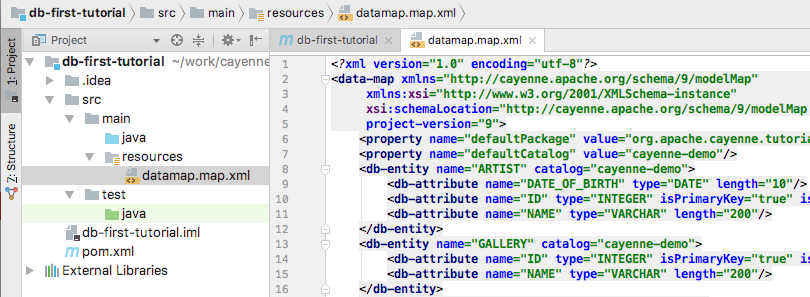
Great! We now have Cayenne DataMap file that describe model from our database and cayenne-project.xml file.
If you have some problems with configuration you can always delete datamap.map.xml file and try again. |
2.1.3. Setup Modeler Maven plugin
Cayenne Modeler can be helpful in case you want to make some customizations to your model, though it’s usage optional.
To launch Modeler we’ll use cayenne-modeler-maven-plugin. Just include it in pom.xml like we did with cayenne-maven-plugin and tell where your project is:
<plugin>
    <groupId>org.apache.cayenne.plugins</groupId>
    <artifactId>cayenne-modeler-maven-plugin</artifactId>
    <version>${cayenne.version}</version>
    <configuration>
        <modelFile>${project.basedir}/src/main/resources/cayenne-project.xml</modelFile>
    </configuration>
</plugin>
To launch it simply run:
$ mvn cayenne-modeler:run
3. Advanced usage of cdbimport
3.1. Updating model
We now have everything we need, let’s try some more features of plugin.
3.1.1. Update DDL
To show next feature let’s imagine that over some time our database schema has evolved and we need to synchronize it with our model, no problem we can simply run cdbimport again and all changes will be loaded to model. We use following SQL script to alter our demo database:
CREATE TABLE cayenne_demo.painting_info (INFO VARCHAR(255) NULL, PAINTING_ID INT NOT NULL, PRIMARY KEY (PAINTING_ID)) ENGINE=InnoDB;
ALTER TABLE cayenne_demo.gallery ADD COLUMN FOUNDED_DATE DATE;
ALTER TABLE cayenne_demo.painting_info ADD FOREIGN KEY (PAINTING_ID) REFERENCES cayenne_demo.painting (ID);
3.1.2. Run cdbimport
Now we can simply run again
$ mvn cayenne:cdbimport
You should see output similar to this:
...
[INFO]   Table: cayenne_demo.artist
[INFO]   Table: cayenne_demo.gallery
[INFO]   Table: cayenne_demo.painting
[INFO]   Table: cayenne_demo.painting_info
[INFO]     Db Relationship : toOne  (painting_info.PAINTING_ID, painting.ID)
[INFO]     Db Relationship : toOne  (painting.ID, painting_info.PAINTING_ID)
[INFO]     Db Relationship : toOne  (painting.GALLERY_ID, gallery.ID)
[INFO]     Db Relationship : toMany (gallery.ID, painting.GALLERY_ID)
[INFO]     Db Relationship : toOne  (painting.ARTIST_ID, artist.ID)
[INFO]     Db Relationship : toMany (artist.ID, painting.ARTIST_ID)
[INFO]
[INFO] Detected changes:
[INFO]     Create Table         painting_info
[INFO]     Add Column           gallery.FOUNDED_DATE
[INFO]     Add Relationship     paintingInfo painting->painting_info.PAINTING_ID
[INFO]
[INFO] Migration Complete Successfully.
Let’s run Modeler and check that all changes are present in our model:
$ mvn cayenne-modeler:run
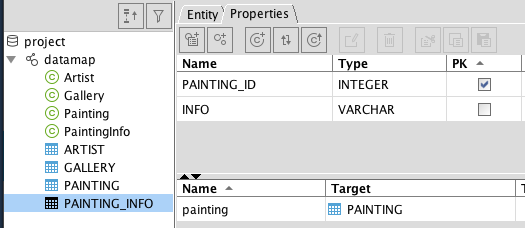
Great! New table and ObjEntity are in place, as well as a new field.
3.1.3. Customizing Model
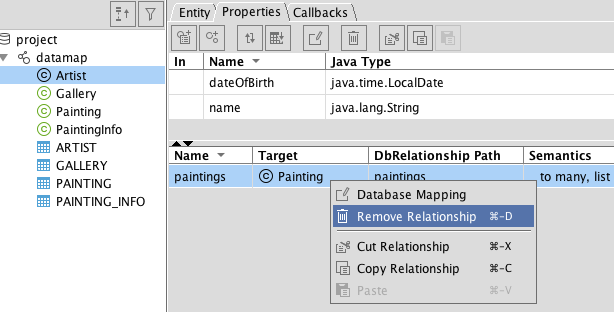
There is often a need to customize model to better fit it to your application requirements, such customization can be simple removal of toMany part of a relationship between two objects. Let’s do it, in a Modeler just select and remove relationship paintings in Artist object:
Now if you run
$ mvn cayenne:cdbimport
it still find nothing to do:
...
[INFO] Detected changes: No changes to import.
cdbimport will skip only modifications in Object layer (e.g. ObjEntities, ObjAttributes and ObjRelationships), if you modify Db layer your changes will be overridden by next run of cdbimport. |
3.2. Advanced filtering
Final part of our tutorial is about fine-tuning what you load from DB into your model.
3.2.1. Update schema
Let’s add some information to our database, that we don’t need in our model:
CREATE TABLE cayenne_demo.legacy_painting_info (ID INT NOT NULL AUTO_INCREMENT, INFO VARCHAR(255) NULL, PAINTING_ID INT NOT NULL, PRIMARY KEY (ID)) ENGINE=InnoDB;
ALTER TABLE cayenne_demo.artist ADD COLUMN __service_column INT;
ALTER TABLE cayenne_demo.gallery ADD COLUMN __service_column INT;
ALTER TABLE cayenne_demo.painting ADD COLUMN __service_column INT;
3.2.2. Configure filtering
Now we need to tell cdbimport what we don’t need in our model, for that we’ll just add following into <configuration> section:
<excludeTable>legacy_painting_info</excludeTable>
<excludeColumn>__service_column</excludeColumn>
After runing
$ mvn cayenne:cdbimport
we still don’t get any changes, exactly as expected:
...
[INFO] Detected changes: No changes to import.
4. Java code
4.1. Generating Java classes
Now as we have our model ready let’s generate Java code that actually will be used in application. In order to do that we’ll use same maven plugin, but different goal, namely cgen. It has many options to configure but default values will do for our case, so we can just call it:
$ mvn cayenne:cgen
You should see output telling that everything is done, like this:
[INFO] Generating superclass file: .../src/main/java/org/apache/cayenne/tutorial/persistent/auto/_Artist.java
[INFO] Generating class file: .../src/main/java/org/apache/cayenne/tutorial/persistent/Artist.java
[INFO] Generating superclass file: .../src/main/java/org/apache/cayenne/tutorial/persistent/auto/_Gallery.java
[INFO] Generating class file: .../src/main/java/org/apache/cayenne/tutorial/persistent/Gallery.java
[INFO] Generating superclass file: .../src/main/java/org/apache/cayenne/tutorial/persistent/auto/_Painting.java
[INFO] Generating class file: .../src/main/java/org/apache/cayenne/tutorial/persistent/Painting.java
[INFO] Generating superclass file: .../src/main/java/org/apache/cayenne/tutorial/persistent/auto/_PaintingInfo.java
[INFO] Generating class file: .../src/main/java/org/apache/cayenne/tutorial/persistent/PaintingInfo.java
[INFO] ------------------------------------------------------------------------
[INFO] BUILD SUCCESS
[INFO] ------------------------------------------------------------------------
In IDEA you should be able to see these newly generated classes:
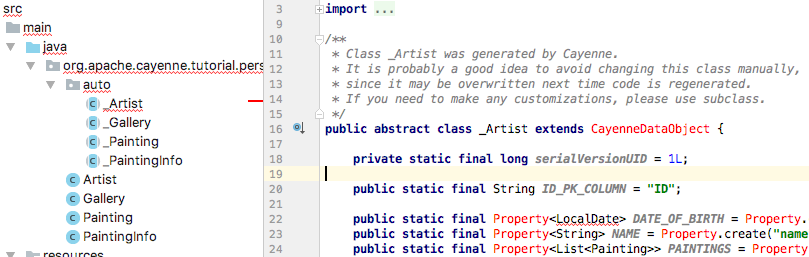
Note that Cayenne code is unrecognized, that’s because we need to include Cayenne as dependency, let’s do this in pom.xml file:
<project>
    ...
    <dependencies>
        <dependency>
            <groupId>org.apache.cayenne</groupId>
            <artifactId>cayenne-server</artifactId>
            <version>${cayenne.version}</version>
        </dependency>
    </dependencies>
Additionally we need to tell Maven compiler plugin that our code uses Java 8:
<build>
    <plugins>
    ...
        <plugin>
            <artifactId>maven-compiler-plugin</artifactId>
            <configuration>
                <source>1.8</source>
                <target>1.8</target>
            </configuration>
        </plugin>
    ...
If all done right your code now shouldn’t have any errors. To be sure you can build it:
$ mvn compile
4.2. Getting started with ObjectContext
In this section we’ll write a simple main class to run our application, and get a brief introduction to Cayenne ObjectContext.
4.2.1. Creating the Main Class
-
In IDEA create a new class called
Mainin theorg.apache.cayenne.tutorialpackage. -
Create a standard
main()method to make it a runnable class:package org.apache.cayenne.tutorial; public class Main { public static void main(String[] args) { } } -
The first thing you need to be able to access the database is to create a
ServerRuntimeobject (which is essentially a wrapper around Cayenne stack) and use it to obtain an instance of anObjectContext.package org.apache.cayenne.tutorial; import org.apache.cayenne.ObjectContext; import org.apache.cayenne.configuration.server.ServerRuntime; public class Main { public static void main(String[] args) { ServerRuntime cayenneRuntime = ServerRuntime.builder() .dataSource(DataSourceBuilder .url("jdbc:mysql://127.0.0.1:3306/cayenne_demo") .driver("com.mysql.cj.jdbc.Driver") .userName("root") // TODO: change to your actual username and password .password("your-password").build()) .addConfig("cayenne-project.xml") .build(); ObjectContext context = cayenneRuntime.newContext(); } }ObjectContextis an isolated "session" in Cayenne that provides all needed API to work with data.ObjectContexthas methods to execute queries and manage persistent objects. We’ll discuss them in the following sections. When the first ObjectContext is created in the application, Cayenne loads XML mapping files and creates a shared access stack that is later reused by other ObjectContexts. -
Let’s now add some code that will create persistent object:
Artist artist = context.newObject(Artist.class);
artist.setName("Picasso");
context.commitChanges();
4.2.2. Running Application
Let’s check what happens when you run the application. But before we do that we need to add another dependencies to the pom.xml - MySQL Jdbc driver and simple logger. The following piece of XML needs to be added to the <dependencies>…</dependencies> section, where we already have Cayenne jars:
<dependency>
    <groupId>mysql</groupId>
    <artifactId>mysql-connector-java</artifactId>
    <version>6.0.5</version>
</dependency>
<dependency>
    <groupId>org.slf4j</groupId>
    <artifactId>slf4j-simple</artifactId>
    <version>1.7.25</version>
</dependency>| Cayenne uses Slf4j logging API, here we will use simple backend that prints everything to console |
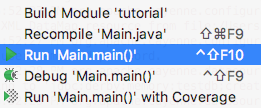
Now we are ready to run. Right click the "Main" class in IDEA and select "Run 'Main.main()'".
In the console you’ll see output similar to this, indicating that Cayenne stack has been started:
[main] INFO: Loading XML configuration resource from file:/.../cayenne-project.xml
[main] INFO: Loading XML DataMap resource from file:/.../datamap.map.xml
...
[main] INFO org.apache.cayenne.datasource.DriverDataSource - +++ Connecting: SUCCESS.
[main] INFO org.apache.cayenne.log.JdbcEventLogger - --- transaction started.
[main] INFO org.apache.cayenne.log.JdbcEventLogger - INSERT INTO cayenne_demo.artist (DATE_OF_BIRTH, NAME) VALUES (?, ?)
[main] INFO org.apache.cayenne.log.JdbcEventLogger - [bind: 1->DATE_OF_BIRTH:NULL, 2->NAME:'Picasso']
[main] INFO org.apache.cayenne.log.JdbcEventLogger - Generated PK: ARTIST.ID = 2
[main] INFO org.apache.cayenne.log.JdbcEventLogger - === updated 1 row.
[main] INFO org.apache.cayenne.log.JdbcEventLogger - +++ transaction committed.
5. What’s next
That’s all for this tutorial! Now you know how to setup and use cayenne-maven-plugin.
Next step will be creating your first application with Cayenne. If you not passed yet, you can try out getting-started tutorial.
You can find detailed information about configuring this plugin in documentation available on Cayenne site.
